The early 2000s were a turning point for American performance cars, with several iconic models hitting the market. During this period, Ford introduced the 5th-generation Mustang, known for its retro design inspired by the classic 1960s models. The Mustang GT featured a strong V8 engine and was considered a quick car for its price range at the time.
As the years passed, the S197 Mustang became known for its limitations in stock form, but that did not stop car enthusiasts from upgrading and customizing these cars. Through a series of modifications and improvements, including supercharging and cooling upgrades, the performance and reliability of the Mustang GT have been taken to new levels, making it a competitive choice even against modern high-powered sports cars.
Key Takeaways
- The 5th-generation Mustang offered a modern take on a classic design
- Upgrades can address the car’s original weaknesses
- Careful modifications help these cars perform at a much higher level
The Golden Age of Early 2000s American High-Performance Cars
Standout Imports and American Legends
The early 2000s brought a wave of exciting cars from both overseas and American brands. Models like the Subaru WRX STI and Mitsubishi Lancer Evolution 8 became popular for their speed and rally-inspired features. From Europe, the BMW E46 M3 impressed drivers with its strong S54 engine, while Volkswagen offered the R32 with all-wheel drive and a unique character.
American brands were not left behind. Chevrolet introduced the C6 Corvette, which delivered impressive performance for its price. Chrysler stood out with bold vehicles such as the Hemi-powered Dodge Magnum station wagon, mixing muscle with practicality. The wide range of choices meant car fans had many exciting options from both domestic and international makers.
| Car Model | Brand | Country of Origin | Unique Feature |
|---|---|---|---|
| WRX STI | Subaru | Japan | Rally-bred AWD performance |
| Lancer Evolution 8 | Mitsubishi | Japan | Turbocharged power |
| E46 M3 | BMW | Germany | High-revving inline-six |
| R32 | Volkswagen | Germany | AWD hot hatch |
| C6 Corvette | Chevrolet | USA | Affordable sports coupe |
| Dodge Magnum | Chrysler | USA | Hemi V8 in a wagon body |
Rise of Vintage-Inspired Muscle Cars
A major trend started in the mid-2000s when Ford showed off its fifth-generation Mustang, codenamed S197. This car’s design took clear inspiration from the classic Mustangs of the 1960s, combining modern touches with retro style. The GT model featured a 4.6-liter V8 making 300 horsepower, providing strong performance at a price under $30,000.
Ford’s move sparked a wave of similar cars from other American makers. Dodge brought back the Challenger in 2009, and Chevy followed by reviving the Camaro in 2010. These muscle cars shared a focus on bold looks and V8 power, paying tribute to their original models.
Key Features of Early Retro-Inspired Muscle Cars:
- Classic styling details
- Powerful V8 engines
- Affordable price points for performance
- Focus on driving enjoyment and straightforward mechanics
This era marked a high point for car enthusiasts who wanted strong performance, unique design, and a connection to automotive history.
S197 Ford Mustang: 5th Generation Quick Facts

Classic Style Returns
The S197 Ford Mustang’s look stands out because it brings back a lot of the style cues from Mustangs made in the 1960s. This design choice set off a trend, inspiring other car companies to bring out “retro” versions of their own classic models. The car made its public debut in 2004 at the Detroit Auto Show. Its strong lines, big grille, and unique tail lights make it easy to spot even today.
- Retro-inspired body lines
- Modern touches built into the classic look
Key Specs and Performance Details
The Mustang GT version came with a 4.6-liter V8 engine. This V8 was rated for 300 horsepower and had three valves per cylinder. With this engine, the S197 GT could go from 0 to 60 miles per hour in just over 5 seconds.
Major specs for the 2005 Mustang GT:
| Engine | 4.6L V8 (3-valve) |
|---|---|
| Horsepower | 300 hp |
| 0-60 mph Time | Just over 5 seconds |
| Price (new, 2005) | Under $30,000 |
Some owners found that over time, the S197 had weaknesses. Parts such as the connecting rods and transmissions were known to be less durable when compared to other cars in its class.
Where It Stands in the Market
When it launched, the S197 Mustang landed in a busy performance car market in America. It was one of the quickest cars you could buy for under $30,000 in 2005. Other popular cars at the time included the Subaru WRX STI, Mitsubishi Lancer Evo 8, and even the Neon SRT-4. Later, the Dodge Challenger and Chevy Camaro joined the retro muscle segment.
- Affordable choice for V8 power
- Faced tough competition from both American and imported performance cars
- Kicked off a wave of classic-inspired designs from other brands
S197 Mustang Drawbacks and Challenges
Platform Age and Design Drawbacks
The S197 Mustang is now considered an older model, and its foundation shows signs of age. While its retro appearance brought excitement in the 2000s, many of its systems feel dated compared to newer vehicles.
- Technology: Lacks many modern features found in newer cars
- Chassis: Not as sharp or rigid as more recent designs
- Aftermarket Limitations: Some parts may be harder to source, and new upgrade options are not as common as they once were
| Area | Limitation |
|---|---|
| Interior | Feels dated, lacks newer tech |
| Suspension | Not as advanced as new models |
| Body | Some fit-and-finish issues over time |
Known Motor and Gearbox Problems
The early S197 Mustang’s V8 motor and transmission both have their weak spots. The engine uses connecting rods that can break under high stress, which limits its reliability and how much power it can safely handle in stock form.
The manual transmission from the factory also tends to be fragile, especially if the car is modified or pushed hard at the track. Many owners replace the stock transmission with something stronger if they want to make more power.
Common Issues:
- Weak connecting rods in the 4.6L V8 engine
- Factory transmission struggles with high power upgrades
- Possible need for expensive replacements if increasing performance
Upgrades often needed:
- Stronger internal engine parts
- More robust manual transmission, like the T56 Magnum XL
Building the Mustang GT: Personal Progress

Timeline of Early Modifications
The journey started with basic upgrades soon after getting the 2007 Mustang GT. The first changes were simple: a new intake system and a Bama tune to boost performance a bit. These upgrades were common and didn’t take long to install.
Over time, the project shifted toward stronger, more reliable parts. Each modification was handled step by step, from pulling out the stock intake to cleaning and prepping the engine for larger changes. The process included using tools like breaker bars, extractor sockets, and even a puller for tough parts. Upgrades were chosen to address weak points, with a focus on durability.
| Upgrade | Purpose | Tools Involved |
|---|---|---|
| Intake & Tune | Increase power, quick mod | Clamp tools, tune device |
| Engine Rebuild | Strengthen internals | Breaker bar, impact wrench |
| Pulley Swap | Boost reliability/support | Sockets, puller, screwdriver |
These steps laid the foundation for bigger changes down the road.
Engine and Gearbox Improvements
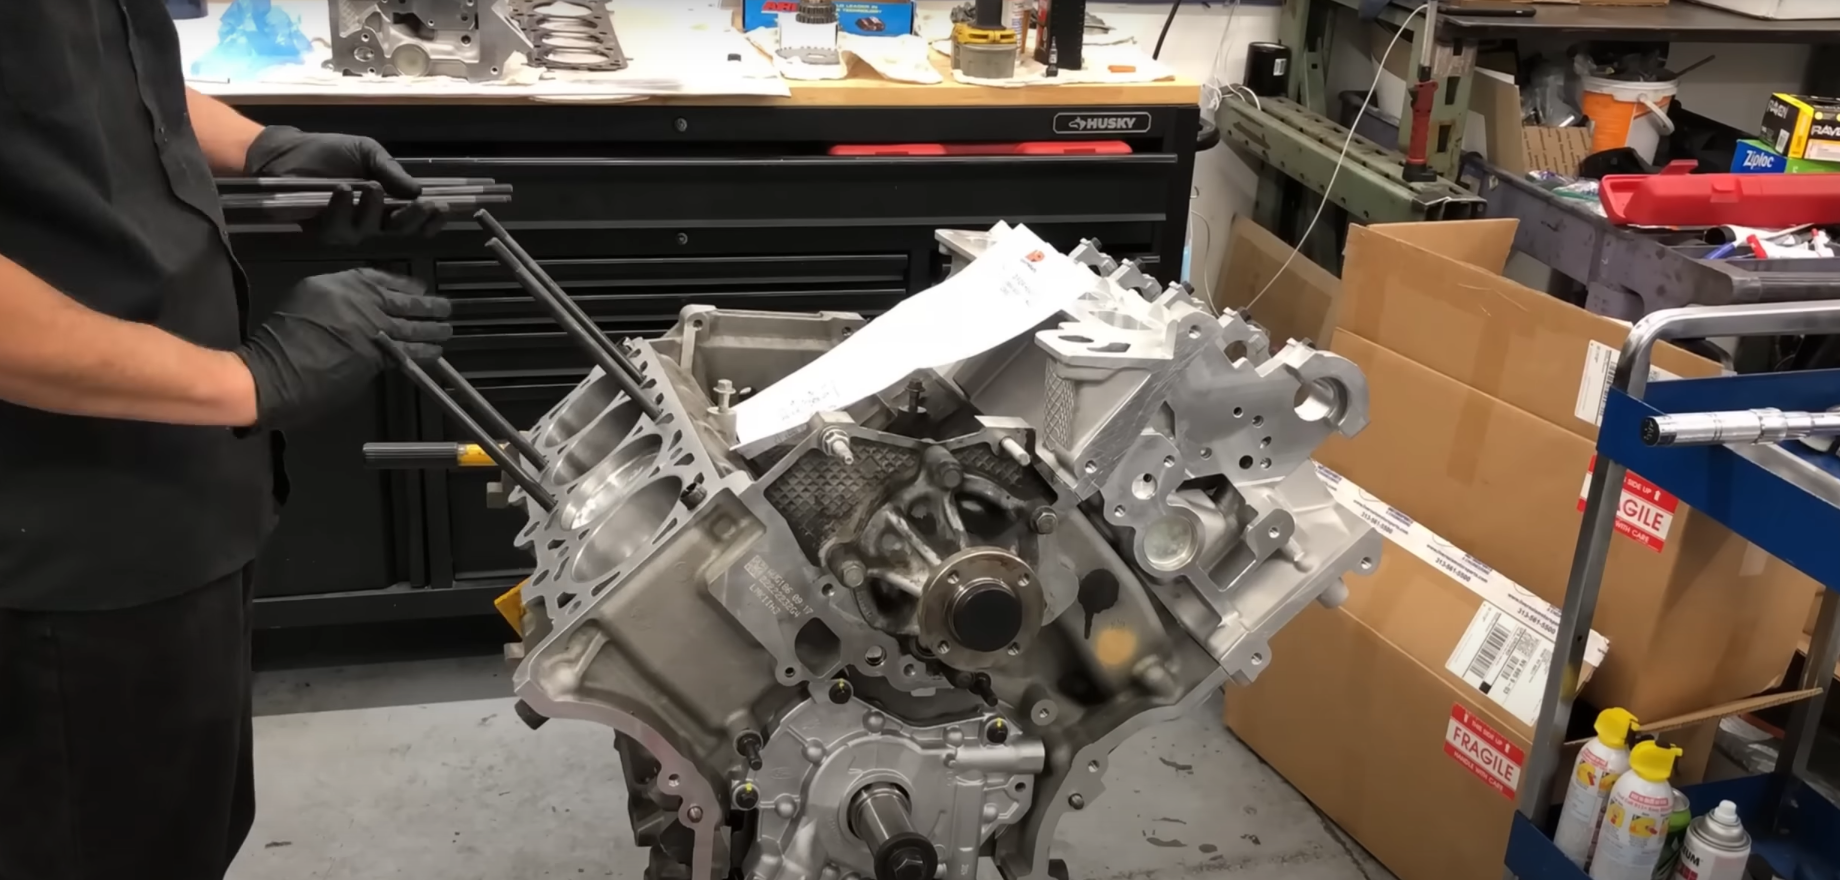
The next stage was about getting serious power and reliability. The original engine was rebuilt using stronger internals to prevent failure from high horsepower or higher boost. This included swapping in more durable connecting rods and parts built to handle extra stress.
The transmission also saw a major change. The old, weaker gearbox was taken out and replaced with the T56 Magnum XL manual transmission. This is known for handling big torque numbers and delivering smoother, faster shifts. Additions like a new radiator, improved fuel system, and a return to stock pulleys made sure the car could manage extra heat and keep the supercharger running at its best.
Key Upgrades Overview:
- Upgraded internals for strength
- T56 Magnum XL transmission for better shifting and power handling
- New radiator and fuel system to keep up with new demands
These changes moved the Mustang from a basic street build to a tough car ready for higher boost and racing challenges.
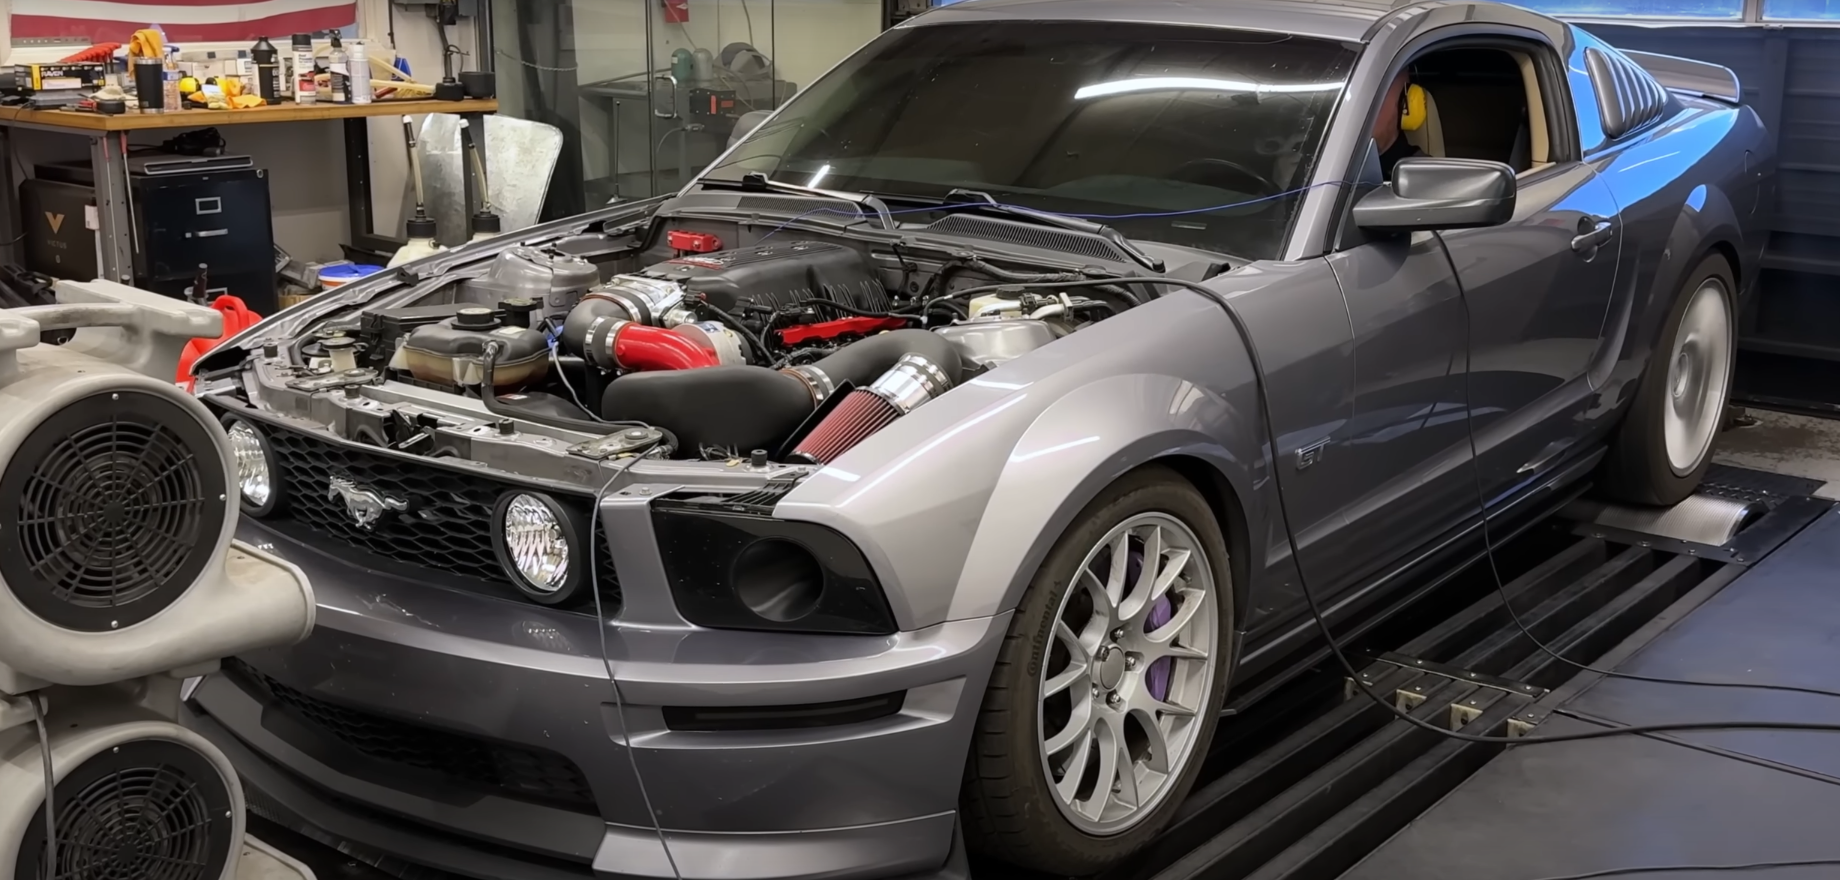
Vortech Supercharger Installation
System Breakdown and Main Details
The Vortech V-3 TI centrifugal supercharger is designed to boost power output. This self-lubricating head unit can support over 950 horsepower with proper upgrades. Alongside the supercharger itself, the installation also involves a higher-capacity radiator and upgrades to the fuel system to handle the increase in airflow and boost.
Key Features:
| Component | Detail |
|---|---|
| Supercharger Model | Vortech V-3 TI |
| Extra Upgrades | Mishimoto radiator, upgraded fuel system |
| Max Power Support | Over 950 horsepower |
The upgraded system ensures reliable cooling and fuel delivery for a high-performance build.
Getting the Engine Bay Ready
Before installing the supercharger, several steps are needed to clear space and prepare the engine bay. The car must be raised for better access, and the front bumper should be taken off. The coolant is drained by removing the 19mm radiator plug.
Parts like the radiator cover, coolant reservoir, and the upper and lower radiator hoses are removed. Detaching the fan shroud, AC condenser, and power steering reservoir makes more room for the new supercharger bracket and related components.
To-Do List:
- Raise the vehicle with a quickjack
- Remove the front bumper
- Drain coolant from radiator
- Take off radiator cover, hoses, and coolant reservoir
- Pull out fan shroud, AC condenser, and power steering reservoir
Taking Out Intake and Fuel Parts
To begin, the intake system must be removed. This means disconnecting the driver-side PCV tube and taking off the bolts that secure the intake. The mass air flow sensor and throttle body connections are unplugged, and the clamp to the throttle body is loosened. The intake assembly can then be pulled off the engine.
Next, the fuel rails are separated from the manifold and the fuel injectors are taken out for cleaning. After that, the intake manifold is unbolted and lifted off, opening up the intake ports for the work ahead.
Steps for Removal:
- Unplug PCV tube and intake mounting bolts
- Disconnect mass air flow sensor and throttle body wiring
- Loosen throttle body clamp
- Remove intake elbow and intake assembly
- Release fuel rails and remove injectors
- Unbolt and lift off intake manifold
Cleaning and Getting Surfaces Ready
With the intake parts out, the area around the cylinder head intake ports is cleaned. Brake cleaner and a paper towel are used to wipe away grime, especially from the cylinder heads and walls of the runners. An extension claw tool helps reach deeper spots.
The intake ports are covered with tape to keep out dirt or dropped objects during the rest of the install. Attention to cleaning and blocking off openings helps protect the engine from damage before reassembly.
Cleaning Checklist:
- Use brake cleaner for heads and runners
- Toothbrush or paper towel for stubborn buildup
- Tape over intake ports to prevent debris entry
Clean work areas and careful prep mean better results and fewer issues during installation.
Improvements to the Engine Cooling System
Radiator Upgrade
A new aluminum radiator was chosen to replace the factory unit. The upgraded radiator is noticeably thicker, with an extra row of cooling tubes that increases both coolant volume and contact area with air. This design helps the Mustang manage higher temperatures that come with supercharging. The chart below highlights key differences:
| Feature | Factory Radiator | Upgraded Radiator |
|---|---|---|
| Number of Cooling Rows | 1 | 2 |
| Coolant Capacity | Standard | Increased |
| Cooling Surface Area | Moderate | Larger |
The new radiator fit tightly but aligned well with existing hardware. After installation, the lower and upper hoses were reconnected, and the air conditioning condenser was reattached with new brackets. Studs from the original radiator were reused to secure the assembly.
Moving the Power Steering Fluid Tank
To install the supercharger kit, the power steering reservoir needed to be repositioned. The old reservoir was removed to provide space along the front of the engine. Its new location ensures the tank does not interfere with supercharger components and keeps fluid lines accessible for maintenance. Brackets and mounting points were adjusted so the reservoir stays secure under normal driving and during spirited use.
Factory Parts vs. Aftermarket Choices
The differences between stock and upgraded parts become clear when looking at performance needs. Factory radiators are designed for standard driving, limiting cooling capacity in high-horsepower situations. The upgraded radiator provides additional coolant flow, more cooling tubes, and a thicker core for better heat management.
A few comparisons:
- Stock: Designed for day-to-day use, not intended for forced induction or racing.
- Upgraded: Ready for supercharging, more durable under stress.
- Reservoir Positioning: Original location was fine for stock setups, but aftermarket modifications require adaptability.
By selecting these enhanced components, the cooling system can better handle the extra heat from the supercharged V8, supporting long-term engine health.